This article is for those who don’t have PEAR framework installed with WAMP or XAMPP servers and want to install it, especially to send email using either WAMP Server 2.0c or older versions.
While reading and following this article, replace the Apache’s and PHP’s version numbers with what your system have.
(Skip this paragraph if you don’t want to know about PEAR and want to go directly to the installation steps.) From PEAR’s page: “PEAR is a framework and distribution system for reusable PHP components”. PEAR has many useful libraries to make various web operations easy. Authentication, Date-Time, Encryption, File Formats and Compression, Images, eMail, Math, Number, Captcha, Validation, Streams, Web Services are few of the categories for which lots of packages are available to use freely. However there are extensive information about them but there is no useful documentation is available on their website about installing PEAR. PEAR is not bundled with older WAMP Server versions; so here are the steps to install PEAR on localhost/WAMP Server. It should also work with XAMPP.
- Create a backup of copy of the “index.php” file of your WAMP Server located at “C:\wamp\www” folder, PEAR installer will replace this file.
- Open php.ini file (“Taskbar WAMP Icon -> PHP -> php.ini” OR “C:\wamp\bin\apache\Apache2.2.17\bin\php.ini”), search for “error_reporting” setting and set it to “E_ALL & ~E_DEPRECATED”.
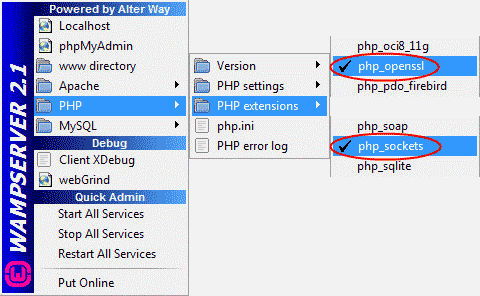
- Enable “php_sockets” and “php_openssl” extensions of PHP:

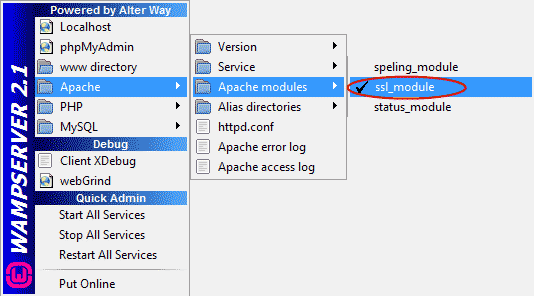
- Enable “ssl_module” module of Apache:

- Create a folder named “pear” inside “C:\wamp\bin\php\php5.2.6” folder.
- Click this link http://pear.php.net/go-pear; a PHP Script file will be shown.
- Press Ctrl + S to save the file. Give “go-pear.php” name to it and save it in the “C:\wamp\www” folder.
- Click this link http://localhost/go-pear.php to start setup of PEAR.
- In the page, click on “Next>>”, “Packages” page will be shown.
- In “Configurations” section, set “Installation Prefix ($prefix)” to “C:\wamp\bin\php\php5.2.6\pear”.
- You may set “C:\wamp\bin\php\php5.2.6” for the 11th option “php.exe path, optional (CLI command tools)”.
- You may select “PEAR_Frontend_Gtk2” and “MDB2” optional packages too for installation.
- Then click on “Install” button. The installation will begin and would download about 4-5 MB of data.
- After installation finish, open “php.ini” file, search for “include_path” setting. If there is a semicolon (;) at the beginning of the line, remove it to uncomment the line. Append “;C:\wamp\bin\php\php5.2.6\pear\PEAR” in the include path.
- Restart all services of WAMP Server.
- Open “http://localhost“. You should see PEAR installer page instead of WAMP Server’s default “index.php”; PEAR installer modifies this file and it will avail the WebFront (web application) of PEAR management. You can view and add more PEAR packages by clicking on the “list all packagenames” link.
- Now you have 2 ways to install the required PEAR packages (MIME_Type, Mail, Mail_Mime, Net_SMTP, Net_Socket), using the WebFront or using the “pear.bat” with Command Prompt. To use the pear.bat with Command Prompt, follow the instruction at Send email from localhost/WAMP server using PEAR Mail and GMail #install-pear-packages. To use the WebFront, click on the Package Search button in the left pane in WebFront; select “pear.php.net” for the Channel dropdown listbox; search and install each packages (MIME_Type, Mail, Mail_Mime, Net_SMTP, Net_Socket) one-by-one; and after installing packages, read ahead from here to process to sending email.